CONSTRUCTION:
- Cut a piece of coax 90” long. If using the 12-foot Radio Shack cable, you will cut off about 54” from one end.
- Make a mark exactly 24” from the cut end. Later we will trim this further.
- Carefully cut a circle around the outer cover at the mark. Just scar it. Try not to cut all the way through and damage the braided shield wire.
- Carefully slit down the length of the outer cover of the 24” cut end. Again, try not to go all the way through the black sheath- just scar it. Peel off the outer covering from the 24” end section.
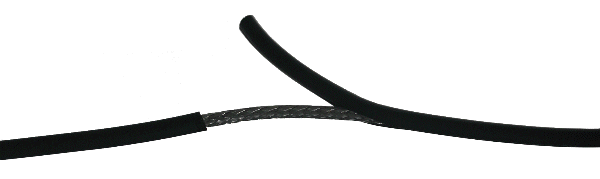
- Push the shield wire backwards so the braid expands. Use a pencil and make a small opening right at the start of the exposed braid and carefully pull through the center conductor. Leave the clear insulator on the center conductor wire.

- Tah-dah! You’re pretty much done now.

- Cover the braided section with several layers of electrical tape to prevent it from coming in contact with other metal in the nose. Tape the intersect area as well.

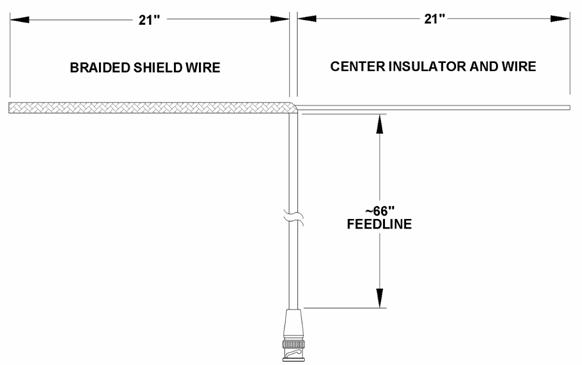
- Re-cut the braid and center conductor ends to 23”. As you continue to trim for minimum SWR, trim evenly to keep both sides the same length.
- NOTE:
- a. If you have a VHF SWR meter and plan to 'tune' this antenna, leave the shield and center at 23”. Start by finding the frequency with the lowest SWR, then trim both ends evenly, in 1/4” increments to 'walk' the minimum SWR frequency to about 122MHz. You can splice more wire back on if you go too far. Mount the antenna in the nose BEFORE tuning as the angle of the leads and their proximity to metal will affect the final tuning.
- a. If you do NOT have a proper SWR meter, cut the center conductor and shield sections to exactly 21”. This will be very close to optimum with an SWR of less than 2:1 across the aviation band.
- To install, start by placing the intersect of the braid, center conductor and feedline in the nose of the plane. The braided section will run to the TOP of the nose cone, the center conductor to the BOTTOM. Temporarily tape so it will stay as you route the feedline back under the nose gear support, across and up the side of the fuselage, and to the radio area. The black plastic spiral wire wrap, also available from Radio Shack, works great to secure the feedline and still allow you to adjust it later. Now use small pieces of tape to temporarily hold the braid to the top and center conductor to the bottom of the nose cone- opposite one another. If you are going to tune the antenna with a VHF SWR meter, now is the time. Otherwise test the antenna and secure it properly.

|