Controlling Throttle Creep
By: Jim Hayward


Some folks have reported trouble with the throttle lever and cable creeping. Apparently engine/flight vibrations can cause the throttle to creep toward idle while in flight thus reducing the power setting. Many times it can even be seen while on the ground. It can be annoying to say the least, as you have to either hold your hand on the throttle all the time or adjust it from time to time in order to maintain your power setting.

One solution is to replace the factory throttle quadrant with a better quality (and more expensive) quadrant than is provided. There are third party vendors who can provide you with different types and styles of throttle quadrants.


One often used method to control throttle creep is by adding more friction to the factory quadrant. This is done by tightening the pivot screw/nut located near the bottom of the throttle lever. This will provide extra friction to maintain the throttle setting against the tension of the carburettor slide return spring(s) inside the carburetor(s). If you have a two place aircraft, both the front and back throttle quadrants may be tightened up, each a bit less than tightening a single quadrant. Experimentation will provide the correct tightness.

         
Click to Enlarge


Another solution is to obtain a small bungee cord, attach one end to some place forward of the throttle lever, wrap a turn or two around the throttle lever, and attach the remaining hook to the same place as the other hook. Experimentation is required to obtain the proper balance of forward tension on the lever (provided by the bungee cord) with the rearward tension provided by the carb springs. Placement of the bungee cord hooks may also determine the length and/or size of bungee cord to use.

Still another solution is to remove the top cover of each carburetor and cut some turns off of the large slide return spring. Some set-ups only require the removal of two turns, some three turns, and still others have needed to remove four turns. If you decide to use this method, remove two turns for starters, try it out then remove another turn and try it again. The most you should have to remove is four turns.


Click to Enlarge
         

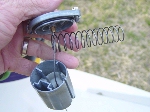
This photo shows the slide return spring with the carburetor's top removed. This particular spring has had three turns removed. Also, the spring's "retaining ring" in the top cover is deep enough that the spring cannot wander out of it due to no longer having a "flat end". With the carburetor top in place, the spring is compressed so the turns are closer together than you might guess from this photo. This places even more of the spring in contact with the retaining ring.


In this photo, you can see how the end of the spring has been bent slightly to avoid the sharp, cut end from causing any problem in the top cover. For anyone concerned about uneven pressures due to not having a "flat end" on the spring, you can see that there is plenty of spring remaining to smooth out any possible uneven pressures.

         
Click to Enlarge


Click to Enlarge
         

It's recommended to cut the top end of the spring rather than the end in the white plastic cup. A side benefit of removing turns from the spring's top end is that when you want to change your needle position due to season changes, all you need do is "unscrew" the spring from the cable since the spring now has an open end. Simply compress the spring slightly to get it out of the top, slip the open end over to the cable and the cable will nicely fit thru it. Start rotating the spring so that it almost is completely out of the cable. Now you won't have to fight the spring tension to get the needle changed. This photo shows the spring having been "unscrewed". After the spring is away from the cable as in the photo, you can simply lift out the needle/cup assembly, reposition the needle, put the assembly back in and "screw" the spring back into place.


Remember, remove turns equally from each carburetor but one turn at a time, trying two turns for starters. Reassemble the carburetors, run the engine (or go fly) and check out the difference. If it's not quite enough and still creeps rearward, return and remove another turn, etc. You may combine turn removal with friction tightening to achieve your desired effect. The springs are more than adequate in their job so removal of a few turns should not be a problem.