


Securing & Riveting The Wing Ribs
Poly Fiber System
It is necessary to secure the fabric to the wing ribs. In this procedure, we hope to demonstrate the proper way of doing this.
It is advised to obtain the Poly Fiber booklet for theier asking price of $10.00 before proceeding with any covering of painting. Their book, "How To Cover An Aircraft Using the Poly-Fiber System" is available at Poly Fiber's web site, PolyFiber.com, or from a Poly Fiber dealership.
Items you will need to complete this job are: 3/8" wide reinforcing tape. This is a fiber tape that was sent with your kit. Surface tape, Dacron 2" Pinked, available from Aircraft Spruce and other suppliers. An inexpensive soldering iron. Rivet gun, a pneumatic rivet gun will help a lot. Small 2" paint brush to apply the glue. And a pair of scissors. |
|
|
|
 |
 |
 |
 |
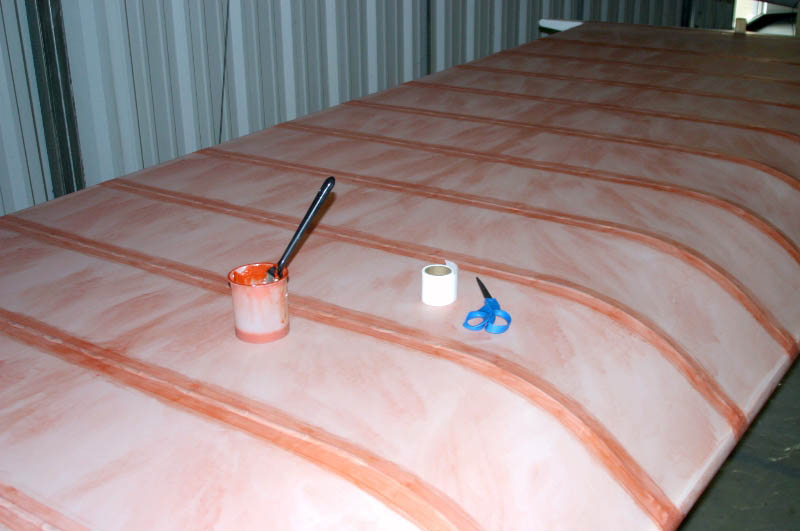
The builder of these wings applied the first brush coat of Poly Brush to the entire wing fabric prior to adding the rib tape and rivets. Poly Brush leaves a pinkish color to your fabric. Before applying the reinforcing tape to the ribs, use MEK to reactivate the Poly Tak glue on the ribs below the fabric, working it up into the fabric. |
 |
Here, the builder first applied an inexpensive masking tape to mask off the finishing tape area above the ribs, which is just slightly wider than the pinked cut, 2" finishing tape. |
 |
 |
After the above masking has been done, apply two coats of Poly Brush, (allowing each coat to dry between applications), to the masked 2" area between the masking tape. This will help the finishing tape adhere better when applied later in this process. |
 |
After the second coat of Poly Brush has been applied, remove the masking tape. You are now ready to move on to applying the reinforcing tape. |
 |
Apply the 3/8" reinforcing tape on the fabric directly above the ribs. The tape should extend about 4" past the first rivet hole on both ends on the ribs. You will now want to open the rivet holes in the tape and fabric. Run your finger firmly over the tape to make depressions in the tape where the rivet holes are in the ribs. This is the best way to find the holes. Now, use a soldering iron with a pencil tip to burn or melt the tape and fabric to open the rivet holes for the rivets to be inserted. |
 |
NOTE: The rivets for the ribs have much larger heads at 3/8" width than the standard rivets at 1/4". You may also need to use a 1/8" drill bit to clean out the holes prior to inserting the rivets. You are now ready to insert the rib rivets and rivet them down. |
 |
 |
 |
 |
Start at the leading edge as it is the more difficult area to get the tape to lay "flat" when gluing it down with Poly Brush. Start with first applying about 5 inches of fresh Poly Brush with a 1-1/2" brush to the leading spar and beginning of the rib. Now quickly lay your finishing tape onto the wet Poly Brush and work it down into the glue and to flatten and smooth the tape, then apply a thin, wet coat of Poly Brush to the top of the tape. While working up over the bend in the ribs, only do about 6 inches at a time in the same manner. You can start doing about 10 inches at a time on the flat area of the wing ribs. |
 |
When you get to the trailing spar, measure and cut off the excess tape so it ends at the center, front of the spar prior to gluing it down. After finishing gluing each finishing tape, the builder used a little MEK on a rag to clean up the excess Poly Brush along the tape edge. |
Now you will want to apply the finishing tape to the front and rear spars. When applying the finishing tape, it will cover and lock in the finishing tape ends you just applied to the ribs.
Use the same gluing method to glue down the spar finishing tape as you used with the rib finishing tape. |
 |
After you have finished applying the finishing tape to all the ribs, you will need to iron the tape edges and between the rivet heads under the finishing tape. This will smooth out and lay the edges of the tape flat to the fabric. Note that air pockets have occurred between the rivet heads. It is almost impossible for this not to happen. Using a "TAK IRON" set at about 275F degrees, iron out the air pockets between the rivet heads. The Poly Brush will become tacky and bond the tape to the surface below, holding it down. This will matter for good looks when you start painting. |
If you have not already installed the ailerons onto the wing's trailing spar, then this would be a good time to do so. We will be adding a hinge area gap enclosure using the 2 inch straight Dacron tape. |
 |
Roll out enough 2 inch Dacron tape to span the distance from one aileron hinge to the next, then cut to fit between the two hinges. Using Poly Brush and a 2 inch brush, apply about a foot of a wet coat to the wing spar area from about the top of the spar to the hinge pin area. Lay your 2 inch tape into this area in a "V" shape, pressing the tape into the wet Poly Brush coat. Add additional Poly Brush to the top of the tape, working it through the tape to the covered spar surface. |
 |
Work in about 12 inch sections, laying down the 2 inch tape until you reach the second hinge. Now, do the same on the aileron spar, adhering the Dacron tape to the aileron. This will make what will look like a gutter between the wing and aileron. As an end result, the tape applied between the wing and aileron will help reduce trailing wing turbulence. This area ABSOLUTELY MUST BE SEALED to avoid aileron flutter. |
SPECIAL NOTE: For those of you who feel you may need to remove the ailerons for any reason in the future, you may wish to consider applying this seal after your paint job is finished. In this case, it has been suggested to use 2 inch, 3-M super clear packing tape as it's thicker than standard packing tape and holds up for a long time. This way, if you ever need to remove the ailerons, just remove the packing tape. CAUTION: One problem that has been encountered when using a "removable" tape is the tape may also remove paint as it is peeled off. This situation can be avoided by allowing the paint to cure for a couple of weeks before applying the tape. Otherwise, with the permanent solution above, you will need to cut the Dacron tape in half to remove the ailerons. |