

Shoulder Belts Installation
Two Different Builds
Two Kinds Of Hardware
The following documentation is from two different Challenger kits. The first kit was delivered to the builder near the end of 2003. The second kit was delivered to the builder in September of 2004. You will note some slight changes in the shoulder strap mounting hardware. The shoulder strap mounting instructions were the same in both kits. Therefore, mounting will be the same.
WARNING: Be aware, the factory mounting instructions for measurement of the front shoulder harness is "INCORRECT" and needs to be moved further back or forward on the root tube to be installed.
Reason: The center cross brace support of the "Top Door Frame Assembly" is located exactly where the forward shoulder strap measurement is given in the mounting instructions that come with the shoulder strap option kit.
In the 2003 kit, the shoulder belt mounting hardware consists of 2 ea. bolts, 2 ea. nyloc nuts, "8 ea. small washers" and 2 ea. straight steel belt holders. |
|
|
|
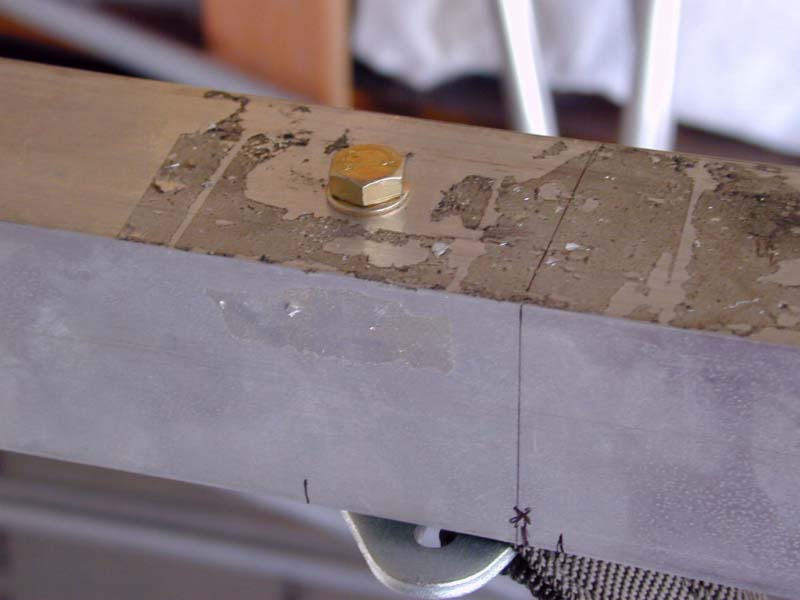
In the 2004 kit, the shoulder belt mounting hardware consists of 2 ea. bolts, 2 ea. nyloc nuts, "4 ea. large area washers" and "2 ea. curved and chromed belt holders". The curved belt holders facilitates not having to place any washers under the belt holders. As can be seen in the first photo, (below), the front shoulder strap hardware has been moved back by 1-1/8" from the original 5" measurement in the mounting instructions to behind the top door frame center cross brace. This giving the new mounting location of 6-1/8", measured from the center of the front seat down tubes. If desired, you can also choose to locate the front shoulder harness forward of the top door frame center cross brace, but this may cause your shoulder harness to be too loose and not hold you properly in the case of a hardy down-draft. |
 |
 |
 |
 |
2003 Kit: The rear seat aluminum backing panel will need to have a rectangular, oval or round hole cut out of it to allow the shoulder straps to feed through the hole, then down to secure to the lap safety belt. First, you will need to drill a hole to allow a metal cutting jigsaw blade through to allow you to cut the desired hole for the belts. A Dremel tool can also be used to cut this hole with a cutting wheel. |
 |
||
Once the hole has been made in the backing plate, you will now wish to use a file to smooth out the sharp, cut edges. Place some type of edging material around the hole to protect the harness belts from being cut by sharp edges in the aluminum or possible excess wear to the harness. All that is needed is a rectangular strap feedthrough hole large enough for the belt to pass through. Follow the instruction sheet that comes with the belt kit to drill and mount the shoulder strap hardware. The bolt drilling measurements for mounting the belt retaining hardware are correct for the rear shoulder harness. |
 |
 |
|
 |
2004 Kit: In this kit, the builder decided to cut out an oval, but a little lower. The placement of the belt feed through hole is subjective, depending on your viewpoint. For a larger passenger, the higher hole may be better. In this one, the builder cut the hole or oval lower to accommodate an average or smaller person. This will allow the shoulder straps to be lower and a little more snug over the passengers shoulders. |
 |
||
The cut edge in the seat backing plate was smoothed out with a file and a flexible plastic auto door edge trim was cut to size and fitted tightly over the cut edge of the oval. Sanding of the backing plate will be the final touch up prior to covering the fuselage. |
 |
 |
 |
You are now done with this section of the build.
Please return to the Featured Build Menu by clicking on your browser's "BACK BUTTON".