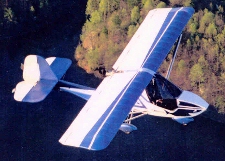
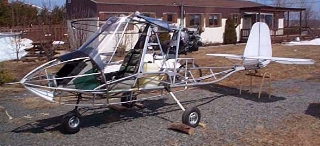
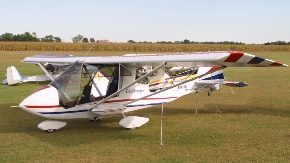
The following photos are examples of ways to build or modify the Challenger nose cone. The factory nose with bow wing tips (left), hand made Tubular nose cone (right) and fiberglass nose cone with Hoerner wing tips(bottom).
 |
 |
 |
The fiberglass nose cone is an "Option" for the Challenger kit which improves the looks and aerodynamics of the aircraft. This web page will include a modification within the fiberglass nose cone option. USE MODIFICATIONS AT YOUR DISCRETION!
SPECIAL NOTE: Before you can apply any paint to a fiberglass surface, you will first need to sand all surfaces, then apply an epoxy coat or a two part epoxy primer, otherwise your final paint job will not stick to the fiberglass surface and will peal off. Perhaps a two part "white" epoxy primer would be best as white gives you a clean slate for a background color and will not effect the color of your final coat.
TIP #2: Consider using a white two part epoxy primer on the inside of your nose cone. Why? Well, when you have to get in there to work later, it will be much easier to see things if the area is a light or white color then black. Think about it!
 |
Before you can start to mount your new fiberglass nose cone, you first have to remove the front stringers. 1. Top Stringer; 2. Bottom Stringer; 3. Stringer Brace and 4. 1st Stringer rib. (If not done at the Factory)
After you have removed the factory nose stringers, you should install a 1/2" aluminum tube between the two front stringers or the aluminum angle supplied with the nose cone kit. (See Drawings) |
 Click to Enlarge |
 |
A triangular "V" shaped relief cutting or material removal from the nose cone at the bottom corners of the cone is a recommended modification for an easier fit to the fuselage nose, but not necessary. The "V" shaped relief cutting should be about one half inch (1/2") in width at the widest point and four (4") inches deep. |
 |
 |
This can be accomplished using a Dremel tool with a fiber cutting wheel.
NOTE: This procedure may be done for a smoother fit if required or desired. |
 Click to Enlarge |
 |
Note the material removal of the nose cone at the top. This is done prior to receiving the nose cone. Apparently something new. |
 |
 |
Using a laser pointer is just one method of precisely aligning your nose cone with the fuselage. Be sure to attach the laser so it is centered and perfectly aligned with the Root Tube. Another method, and much less expensive, is to take something like a broom handle, placing and attaching it dead center into the Root Tube. Then hang a plumb bob from the end to just barley miss the tip of the nose cone. |
 |
 |
Once you have the nose cone Cleco'd in place, slide a wooden dowel down thru the nose gear housing, let it rest on the inside of the nose cone and mark its position. Our builder is using Bill Volcko's hydraulic nose gear which requires a larger hole to accommodate a bolt that locates right at the hole. Therefore, the hole in the nose cone was enlarged a little over the normal hole for the stock gear at 2.75 X 3.25. The stock gear fork hole would normally be 2.25" in diameter. The nose gear installation will be covered in another site build web page. |
 |
NOTE: We will be installing the Pitot Tube in the forward Gap Cover instead of the nose cone.
Here is a web page we have put together on possible "Pitot Tube Styles and Placements".
If you have a Pitot Tube installation you would like to share with others, please send it in and we will get it on this web page. Please include photos and text information on the installation.
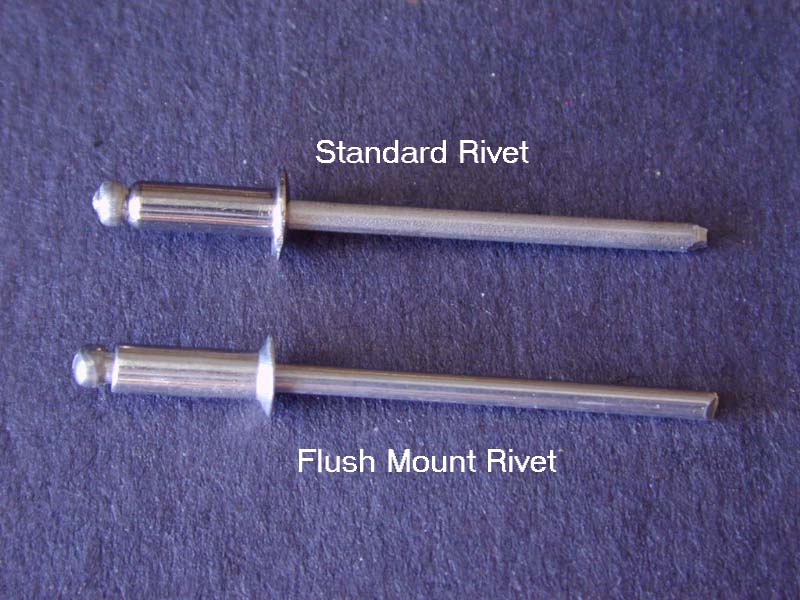
RIVET SIZES & PLACEMENT: Once your nose cone is clamped into place, you will want to mark the following positions for drilling. If you wish to have an almost invisable rivet, use 3/16" countersunk rivets "ONLY". If you wish to have "INVISABLE" rivets, use Super Fil to fill the heads of the rivets. Sand smooth when dry. CAUTION: If you do this last step, you'll have difficulty finding the rivets after painting if you ever need to remove the nose cone. BOTTOM: Use 6 each 1/8" x 1/4" long aluminum rivets, spaced evenly apart. |
 |
After holding the nose in place with clecos, you can then complete the install by riveting the cone to the fuselage. Some builders choose to use countersunk rivets instead of standard rivets with the nose cone. |
 |
 |
After the nose cone has been installed and riveted into place, you will need to fill the "V" cuts in the bottom of the nose cone. Recommended filler is angel hair fiberglass or Super Fil epoxy filler. |
 |
Let dry, then sand smooth with the surface of the nose cone. It would be recommended to use a final sanding grit of 220, though I would personally go down to a 320 grit for a really smooth surface. If there are any low spots, a second coat may be necessary. Again, let dry, then sand smooth with the surface of the nose cone. |
 |
 Fabric Transition Plate |
After your nose cone has been completed, attach the .025 aluminum sheets that comes with the nose cone kit to both sides, just overlapping the edge of the nose cone. You may wish to contour the cone & aluminum sheeting to conform with the side rail to FB-1. Use 1/8" x 1/8" long rivets.
However, many builders opt to buy their own aluminum sheeting, 5" wide and run it continuously from one side rail, under the plane and up to the other side rail resulting in a smooth fabric transition. That's it, you're done. |
 Fabric Transition Plate |
Please return to the Featured Build Menu by clicking on your browser's "BACK BUTTON".