When I was trying to decide what paint system to use to paint my Challenger II, I was soon confronted with several other concerns. It turns out that the decision of what paint to use was multi-faceted.
The following are some of the things people were telling me I had to consider:
- How much money I was prepared to spend
- How much shine did I want in the finished paint
- Did I think I might have to repair or blend in new paint later on
- Did I want to do the painting myself
- Did I have acceptable, available space to use for the painting
- What type of painting equipment would be needed
As this article is about my building a fresh air delivery system, I won't go into my decisions concerning the questions above except to say I wanted to use the Aerothane paint system. The Aerothane paint REQUIRES that the painter be supplied with clean fresh breathing air. This is critical because the paint and catalyst mixture can do serious damage to the painter's lungs.
Fresh air delivery systems can be purchased on the retail market. But, being from the old school, I chose to build/assemble my own. Keeping in mind that the air intake must be located in an area of clean fresh air some of the things/parts I had to produce and procure were:
- A fan capable of supplying sufficient fresh air to the painter.
- Duct tubing, flex tubing and transition pieces for carrying air from the fan to the painter.
- A face mask or hood.
| I decided to use the HVLP paint sprayer unit shown to the right. This I purchased from Home Depot. |  |
 |
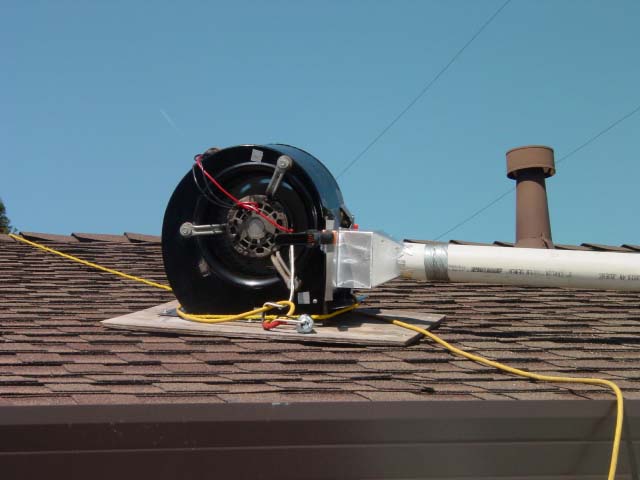
For the fan I used a squirrel cage taken from an air conditioning unit that I located and purchased at a local dump. The fan along with the transition piece I fabricated is shown in the photo to the left. |
The fan was placed on the house roof next to and high above the paint booth. This put it well away from the booth interior and the damaging paint-contaminated air. Several lengths of 4” PVC pipe and fittings were used to connect the fan to the booth sidewall. From there to the spray gun, a 1.25" flex tube was routed. The following views reveal just how this was done.
 |
 |
 |
 |
 |
| Next I fabricated a transparent hood. This was accomplished by using a cylindrical storage bag. A couple of wire clothes hangers were bent to form a cross and a circle wired together and attached to the inside of the bag. A baseball type cap was then wired to the clothes hanger frame inside the bag. This set up work well enough for the painting of one airplane. The picture to the right shows the painter in the paint booth wearing his one-piece paint suit and hood. If you look closely, the air delivery hose can be seen entering the suit at about waist level and routed up to the area under the hood. This really did a great job. It provided all the fresh air that was needed and, because this air in the hood had just enough pressure to keep the outside air in the paint booth out of the hood, absolutely no paint fumes were ever smelled in the hood. |  |
The finished painted airplane.
 |
What I did is just one way to approach building a breathing system. There are as many other ways as your imagination can conjure up. I must say putting this system together was very satisfying; I would definitely recommend anyone thinking about doing his or her own thing on building a painting system to do so. Just remember to have fun with it and be safe with whatever you do.