Installing Factory & Custom Throttle Quadrants


Installing Factory Issued Throttle Quadrant Assembly


As usual, there are more than one type of throttle quadrant assemblies available for the Challenger and other similar aircraft. We will be showing you how to fit and install the factory issued throttle quadrant as well as showing you an upgrade set available from Bob Robertson of Aero Controls, Canada.

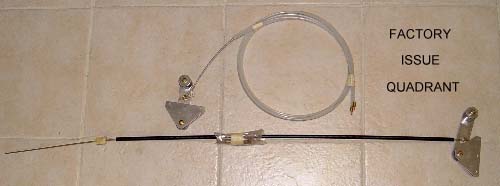
The factory issued quadrant consists of the throttle quadrant and a separate quadrant for the enrichers. Some call this the "choke". Whereas the throttle quadrant will be installed at the fuselage side rail, the enricher quadrant will be installed above on the root tube. You will also need to temporarily mount your engine, with carburetors, on its root tube for this installation to help with determing cable lengths.


Factory Issue Throttle Quadrant Assembly


Choosing The Position Of Quadrant Lever Assembly

Click to Enlarge
         

Selecting the position for your throttle quadrant lever assembly is more of a "fit" to your needs and one you should feel comfortable with when flying. First of all, the quadrant can be positioned on either the left or right side of the fuselage, whichever you feel you would be more comfortable with. Sit in the front seat with cushions, bend your elbow so your hand is forward. This should be where you will want to rivet the throttle quadrant lever assembly to the top side rail. The rear quadrant lever assembly position will be dictated by the length of the quadrant lever attaching cable, which is much thicker and stronger than the quadrant cables that run back to the carburetors.

In the photo above, the builder placed the throttle quadrant levers too far aft for easy and comfortable handling. As stated above, you should place the levers where you will be comfortable with them when flying.


Mounting The Quadrant Lever Assembly

Click to Enlarge
         

As stated above, the sleeved lever to lever quadrant interconnecting rod is much thicker and stronger than the throttle cables that run back to the carburetors. You will need to feed one end of this rod through the front quadrant lever cable - secure fitting and tighten the setscrew down onto the rod. For safety reasons bend the tip of the rod down a little to help keep the rod in place when in use. This will help prevent any possible slippage.

         
Click to Enlarge

NOTE: The builder will be removing the quadrant lever assemblies after fitting all of the cables. You will note the builder used aluminum rivets to hold the lever assembly in place during fitting of the cables. These rivets will be removed and replaced with stainless steel rivets when the lever assemblies are permanently installed. This will be after the covering and painting of the fuselage is completed.


Click to Enlarge
         

Although this photo on the left is a bit blurry, you can still see how the cables are connected to the rear throttle quadrant lever. You will be attaching the two throttle cables which will run back to the two carburetors on your Rotax 503 engine.

Use Clecos during the fitting process, replace the aluminum rivits with stainless steel rivets when the throttle cable fitting has been finished and ready for permanent mounting.

         
Click to Enlarge


Mounting The Enricher Lever Assembly

Click to Enlarge
         

The best location for the enricher lever is wherever it would be most comfortable for you to reach, but will not come in conflict with the flaperon crank handle. The lever assembly can be permanently riveted with stainless steel rivets at this point in construction.

Like the throttle cables, you will want to mount the enricher cables with Clecos first while fitting them to the carburetors.

         
Click to Enlarge


Fitting Throttle and Enricher Cables To Carburetors

In this step, you will not actually be connecting the cables to the carburetors, but instead just fitting the cables to their proper locations at the carburetors. The important thing here is to adjust the cable lengths for the amount of cable needed to properly reach the carburetors with any excess cable being kept inside the fuselage.

You will permanently attach the cables to the carburetors during the final engine mounting stage of building your Challenger.

         
Click to Enlarge

You may now permanently secure all the cables with stainless steel rivets. The engine can also now be removed to continue with your building process.


Installing The Aero Controls' Throttle Quadrants


With Aero Controls' throttle quadrants, the enricher quadrant is included as part of the assembly; see below. This makes the quadrant package a little more user friendly during start-up and flying. Custom quadrants are available from Bob at Aero Controls. Complete, detailed installation instructions come with the custom throttle quadrants.


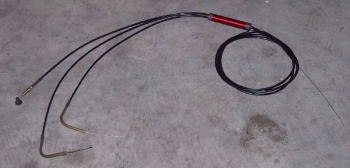
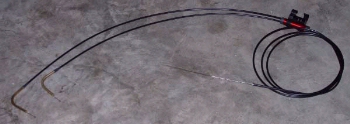
Throttle Quadrant Cables w/Oil Injection Cable                                                            Enricher Quadrant Cables


Installing Quadrant Lever Assembly Mounting Plates

Click to Enlarge
         

With the Aero Controls' throttle quadrant, there is only one location to install the quadrant mounting plate. The front mounting plate needs to be installed at the 45 degree angle tube where the side rail meets the forward down tube. Like the factory version, it would be best to temporarily install the mounting plates with aluminum rivets first for easy removal prior to covering and painting.

         
Click to Enlarge

A total of five (5) securing rivets were used in installing this plate. However, this is entirely your decision as to how many rivets you use. The mounting plate is already affixed with retaining nuts for the four (4) mounting bolts used to secure the quadrant lever assembly to the mounting plate.


The rear mounting plate, like the front, can only be mounted in one location due to the relief cutting in the bottom of the plate to bypass the rear seat crosstube and gusset. Four (4) rivets are used to secure the mounting plate to the side rail and longeron. Like the front mounting plate, the rear plate has retaining nuts affixed for the four (4) mounting bolts used to secure the quadrant lever assembly to the mounting plate.

         
Click to Enlarge

Installing Quadrant Cables

Click to Enlarge
         

Like the factory issued cables, the front to rear lever cables, two (2) each, are thicker and stronger than the quadrant cables. These cables are installed between the rear quadrant lever and front quadrant lever. As supplied the cables have extra length, so it will be necessary to cut the cables to the proper length.

The throttle and enricher cables attach to the front quadrant lever, not the rear lever like the factory issued set.

         
Click to Enlarge


Click to Enlarge
         

The builder drilled 3/8 inch holes in the down bracing below the side rail, inserted rubber grommets and ran the cables through the grommets. In this case, the cables would be out of the way of the passenger in the rear seat and away from the passenger's feet while in the rudder pedals.


Click to Enlarge
         

Both the throttle and enricher quadrant cables have a splitter affixed at about half of its length, going from one (1) cable to three (3) cables, two (2) for the dual carburetor throttles and one (1) for the oil injection, if you ordered with the oil cable. The enricher cable splits from one (1) cable to two (2) cables for the dual carburetor enrichers.

The cables have been tie wrapped to the down tubes in the fuel compartment to secure them from movement. Any extra cable length not needed is contained in the fuel compartment.

         
Click to Enlarge

In this step you will not actually be connecting the cables to the carburetors, but instead just fitting the cables to their proper locations at the carburetors. The important thing here is to adjust the cable length for the amount of cable needed to properly reach the carburetors with any excess cable being kept inside the fuselage.

You will permanently attach the cables to the carburetors during the final engine mounting stage of building your Challenger.

Now is a good time to permanently secure all the cables with stainless steel rivets. The engine can also now be removed to continue with your building process.